In the world of desserts, there’s something magical about the simplicity and richness of a refrigerator cake. It’s a dessert that brings the nostalgia of childhood and the elegance of simplicity to the table. For those who find solace in the kitchen, or for the busy souls seeking a quick sweet fix, the strawberry refrigerator cake stands out as a timeless classic. With its creamy layers and fresh fruit, it is the embodiment of what easy gourmet can look like.
Why Choose a Refrigerator Cake?
Unlike traditional baking, which can be an exacting science, no-bake recipes offer more flexibility. There’s a freedom to tweak, a simplicity in preparation, and of course, the joy of staying away from the oven’s heat. This particular strawberry refrigerator cake recipe has been tailored to be especially approachable for those who may have more enthusiasm than experience in baking, or simply for those looking for a quick and delightful treat to whip up for unexpected guests or a spontaneous afternoon tea.
Ingredients:
- 200g (2 cups) graham cracker crumbs
- 100g (1/2 cup) unsalted butter, melted
- 1 tbsp granulated sugar
- 450g (2 cups) cream cheese, softened
- 120g (1 cup) powdered sugar
- 1 tsp vanilla extract
- 240ml (1 cup) heavy cream, whipped to soft peaks
- Fresh strawberries, sliced – as many as you like for layering and garnish
Detailed Instructions for Strawberry Refrigerator Cake:
- Creating the Crust: Start with the graham cracker crust, which acts as a sturdy base for your luscious cake. To ensure consistency, mix your graham cracker crumbs, melted butter, and a dash of sugar until the mixture resembles wet sand. Pour this blend into your chosen dish, pressing down firmly and evenly. A neat trick is to use the bottom of a glass to pack the crumbs tightly, creating a uniform layer. This will prevent the crust from crumbling when you cut into your cake. Chill this in the refrigerator while you prepare the filling, allowing it to set and thus holding together better.
- The Filling – First Layer: In a large bowl, whip your softened cream cheese with powdered sugar and a hint of vanilla extract until the mixture is not just combined, but dreamily smooth and devoid of lumps. The secret to a silky filling is room temperature cream cheese – it integrates better and whips up nicely. Should you find little lumps, a pass through a fine sieve can make all the difference.
- Incorporating the Whipped Cream: Take your whipped cream – which should be whipped to soft peaks for optimal folding – and gently fold it into your cream cheese mixture. The goal here is to keep as much air in the whipped cream as possible, which is what gives the filling its cloud-like texture. Fold with a spatula using broad, sweeping motions and resist the temptation to over-mix. Your filling should be voluminous and airy.
- Adding the Strawberries: Retrieve your crust from the refrigerator and layer those vibrant, freshly sliced strawberries on top. Arrange them flat and close together, so every bite gets an equal share of fruit. This juicy layer not only adds freshness but also a natural sweetness that balances the richness of the cream.
- Filling – Second Layer: Gently spread a generous layer of your cream cheese mixture over the strawberries. Use a spatula to smooth it over, taking care not to disturb the berry layer beneath. If you’re aiming for precision, a piping bag could be employed to add the filling before using the spatula for the finishing touches.
- Repeat the Layers: Add another layer of strawberry slices, followed by the remaining cream cheese mixture. This repetition of layers not only adds to the aesthetics but also ensures a consistent fusion of flavors throughout.
- Chill and Set: Patience is your ally here. Allow the cake to chill for at least 4 hours, though overnight would yield an even firmer set. This rest time allows the flavors to meld together and the filling to firm up, making slicing cleaner and more comfortable.
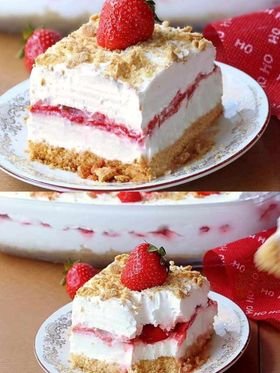
- The Finishing Touch: Just before serving, adorn your cake with a final layer of fresh strawberries for a burst of color and texture. A sprinkle of crushed graham crackers adds a satisfying crunch and a professional touch to your presentation.
- Serving: To serve, dip your knife in hot water and wipe it dry between each slice. This technique ensures clean cuts through the layers, preserving the integrity of your beautiful creation
The Foundation: Graham Cracker Crust
Our journey begins with the crust – the unsung hero of any no-bake cake. A good crust provides a texture contrast to the creamy filling and adds a depth of flavor. For our purposes, graham cracker crumbs mixed with melted butter and a touch of sugar lay the perfect foundation. The crumbs are pressed into the bottom of a dish, creating a firm base that will support the luscious layers to come. Here, we find our first tip: chill the crust before adding the filling to ensure it sets firmly.
The Filling: Cream Cheese Whipped Dream
The heart of this recipe lies in the cream cheese filling. This is where the magic happens. Softened cream cheese is whipped with powdered sugar and vanilla extract, transforming into a smooth, sweet, and irresistible concoction. Folding in softly whipped heavy cream adds lightness and air, making the texture of this cake as light as a cloud. The key here is to achieve a balance between structure and fluffiness, ensuring each bite melts in your mouth.
Layering: The Symphony of Strawberries
Strawberries are not just a garnish; they’re integral to the personality of this cake. Slices of fresh strawberries are layered over the crust, introducing a tart contrast to the sweetness of the filling. A second tip is to choose ripe but firm strawberries for their flavor and their ability to hold up in the cake without becoming too mushy. As they’re layered within the cake, they release their juices, which mingle with the cream cheese mixture, creating a symphony of flavors.
The Refrigerator: Patience Makes Perfect
Patience is a virtue, especially when it comes to no-bake recipes. Once assembled, the cake must be chilled until set. This slow process allows the flavors to meld and the layers to solidify, resulting in perfect slices. The cake should be left undisturbed in the coldest part of the refrigerator, usually the back, away from the door.
Decoration: The Final Flourish
When fully set, the cake is ready to be adorned. More fresh strawberries and a sprinkle of crushed graham crackers not only make the cake visually appealing but also add a fresh and crunchy contrast to the soft filling.
Variations and Adaptations
While the classic strawberry refrigerator cake is a standalone delight, variations abound for the adventurous baker. Consider swapping strawberries for mixed berries, or add lemon zest to the filling for a citrusy twist. The possibilities are endless, limited only by your imagination and palate.
Nutritional Considerations
While indulging in dessert is one of life’s simple pleasures, it’s essential to be mindful of nutritional content. This recipe can be adapted to suit dietary needs, such as using low-fat cream cheese or substituting sugar with alternative sweeteners.
Conclusion: Embrace the Simplicity
In conclusion, this strawberry refrigerator cake recipe is more than just a set of instructions; it’s an invitation to embrace the simplicity and joy of no-bake desserts. It’s an ode to the novice baker, a nod to the time-constrained gourmet, and a testament to the allure of fresh, bright flavors.